
Wednesday, March 2, 2016
Where to go from here...
Essential vs. Non-essential
Patience
Wisdom
Truth
Change has brought me to a little treehouse in downtown Traverse City with my sweet boy and two kitties.
We have encountered and enjoyed lakes, streams, creeks, rivers, ponds, bays and great lakes. There is so much beauty in the place we live. Each day I try get a glimpse of it somewhere, needing that reconnection and affirmation nearly as much as my body needs it to hydrate and survive.
Creativity continues to be my constant companion, whether it's handwork, cooking or solving problems with stories.
What would I love to do all day long?
handwork
sew
connect with friends
sing and play
be outside
paint
read
sleep
walk, bike, swim, ski
take photos
What would you love to do all day long?
Sunday, September 15, 2013
Sew or blog?

My dear friends, please forgive my summer absence! I've been sewing and showing my wares in Northern Michigan. The Frankfort Farmer's Market is a good place to find me on Saturday mornings, set up right by the bay. It's gorgeous, both in location and community.
Family has been at the top of my priority list and we have connected at Green Lake, Glen Lake, Frankfort Beach and on a road trip to Cincinnati, Ohio.
Instagram has been my constant companion, as I can hold my phone in one hand and post quickly between other demands. Let's connect there as I search for the balance in being a parent, artist and blogger.
My fall shows so far include:
Harvest Gathering at the Earthwork Farm in Lake City, Michigan in September
The Children's House Holiday Art Market in Traverse City in November
Tailfeather Design's Shop-n-Sip at Ecco space in Traverse City in December
In the meantime, if you are a tech-savvy person who might be willing to trade your expertise for handmade goods, please contact me!
Sunday, May 5, 2013
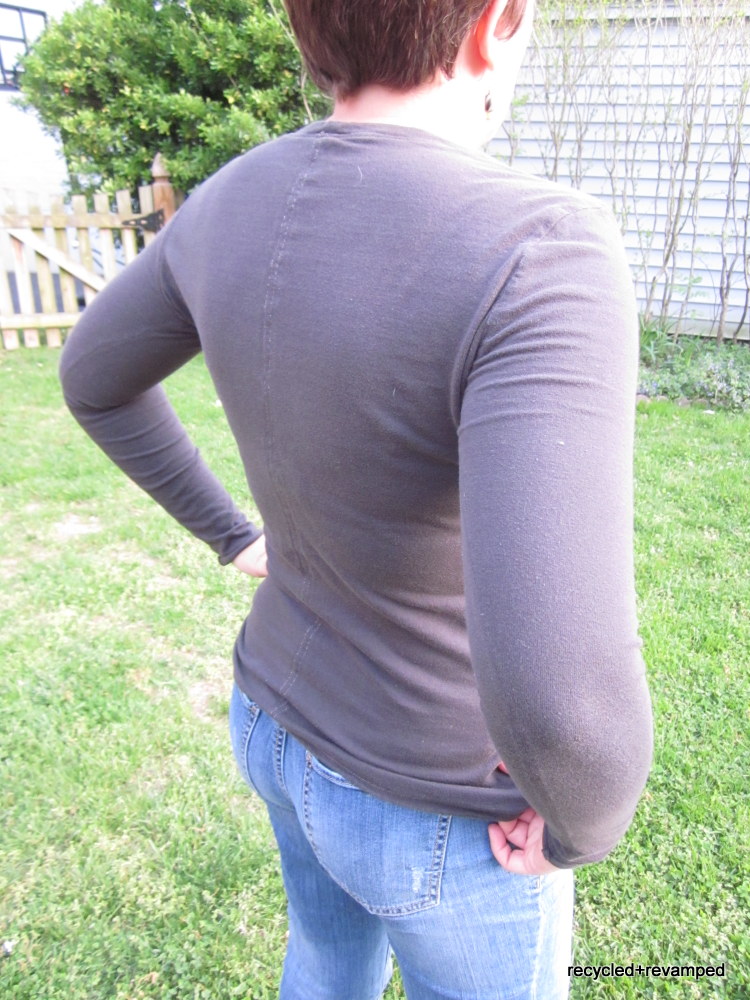
The story of a recycled+revamped shirt, after

Remember the heathery grey shirt that didn't fit quite right?
Here it is now modeled by my sweet bee sister and supermom, Amylynn from littlefarmstudio...

Side seams in both the body of the shirt and the sleeves were trimmed off and a four inch strip of sparkly ponte slipped in it's place. It was hemmed up on the bottom to match the existing hem.
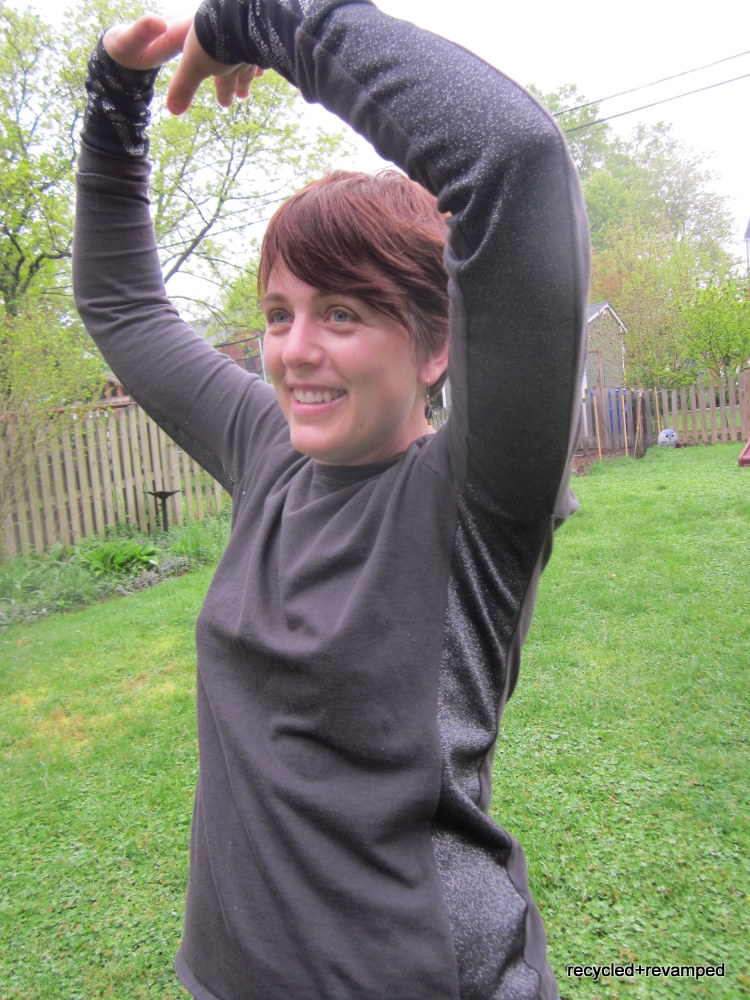
Under the arms, a small cresent shape was stitched and the fabric trimmed out to make room for some supermom style movement.

A little chevron on the sleeves, adding length and some powerful energy!

Both the shirt and the mama were very happy with the revised fit and the shirt now is either being worn or washed instead of lanquishing in the closet.
Don't you just love a happy ending?
Friday, May 3, 2013
The story of a recycled+revamped shirt, before

Once upon a time there was a heathery grey shirt that was made of the softest organic cotton. This lovely fabric is from a small enterprise in the southern United States called Alabama Chanin.
Now as it goes sometimes with sewing and different kinds of fabrics, the fit was just a little off. It was so hard to part with this shirt but it was uncomfortable to wear in the arms and really, all over.
Sunday, April 21, 2013
Craftopia - a collection of art + craft, a creative utopia @ the circuit on May 10, 5-8pm

Hello everyone! recycled+revamped by VictoriaVelting is teaming up with Tail Feather Design to bring you another fantastic event!
✿ CRAFTOPIA - A Collection of Handmade Art & Craft! ✿
Please join us on Friday May 10th between 5 and 8 p.m. at The Grand Traverse Circuit for complimentary wine and edibles to shop locally for yourselves or someone special. It's the Friday before Mother's Day, perfect for giving her (and yourself, because you're so worth it!) something handmade this year!
Featuring locally handmade items from - Tail Feather Design, recycled+revamped by VictoriaVelting, Pretty Stinkin' Green, Leelanau Candle Company, Happy Family Soap, Elarabell studio, Izlla Natural Skin Care, The Plump Pumpkin, Bare North, Sweet Orange Studio, Rosie, Why Knot Fibers, By Katherine, Platinum Bay Collection, KT Strong Designs, Jeannesu and several other talented artists.
Payment options vary artist to artist, so be sure to ask! some have the ability to use a card in addition to cash/check, and others are strictly cash and/or check. please be prepared to spend!
A great Girls' Night Out event! stop in, or stay for the evening! have a glass of wine, enjoy the company, and check out some locally made goodness.
An rsvp is very appreciated (via facebook). we look forward to seeing you! and you, and you, and YOU!
♥ please share this invitation with your friends! they'll thank you! ♥


Saturday, April 20, 2013
Recycled clothing and basic sewing classes at Blackbird Arts in May!
Last night I went to a concert featuring Darlene and May Erlewine, both with Earthwork Music. Both of these women inspire me with the energy they share through music and make me laugh with a hilarious encore performance of DarlenYa's song "Chicken with a Red Dress on". Sitting next to me were good friends, Todd and Elizabeth celebrating a birthday and dancing a beautiful waltz together. Love.
When she wasn't dancing, Elizabeth shared how she has been sewing lately. She is inspired to revamp her clothes and has made a few new things from what she had on hand.
And this in a nutshell is why I sew, teach and blog.
Adults and adults with children 8+
Bring the clothes that no longer work for you, or thrifted items that you want to transform into something simple for spring. Learn basic handstitching techniques to mend holes in basic and creative ways. Brainstorm about the many ways to convert existing clothing to make it fit better or just make it your own. Learn how to add small pieces of new fabrics (like fat quarters or just a 1/4 yard) to revitalize what you have already. Implement your design with needle and thread or bring your own sewing machine (as long as you know how to thread, wind and replace bobbin! remember your foot pedal.).
Prepare to be inspired. You will go home after this class and look at your closet in a whole new way.
Needles, thread, pins and other small notions provided for your use.
Supplies needed:
Clothing to recycle
Any new fabrics you might want to add
Sewing scissors
All levels welcome. If you are a beginner, please join us for the class on Sunday to put your ideas into action with your machine.
Cost: $20 adults, $30 adult with one child 8+

Sewing 101:BYOM (Bring your own machine!)
Sunday, May 19, 1:00-4:00pm
Adults and adults with children 10+
Brush off the dust on your sewing machine and learn to use it! This class includes threading, bobbin winding and insertion and troubleshooting tension. We will practice these techniques as well as straight and curved stitching while mastering the use of the foot pedal. You will then make a small drawstring bag that you can show off to all your crafty friends!
Supplies needed:
Sewing machine
Sewing machine manual if possible
Old clothing or fabric to practice stitching
1/4 - 1/2" yard of woven cotton fabric or a large buttondown type shirt
Sewing machines needles
Extra bobbins
Thread
Sewing scissors
All levels welcome.
Cost: $35 adults
*Already know how to use your machine but want to come sew anyway, and maybe help your neighbor?
Please join us, and bring your revamped clothing projects.
Join us here at Blackbird Arts to sign up for classes.
When she wasn't dancing, Elizabeth shared how she has been sewing lately. She is inspired to revamp her clothes and has made a few new things from what she had on hand.
And this in a nutshell is why I sew, teach and blog.

Be your own Fashion Designer!
Friday, May 17, 6:00-8:00pmAdults and adults with children 8+
Bring the clothes that no longer work for you, or thrifted items that you want to transform into something simple for spring. Learn basic handstitching techniques to mend holes in basic and creative ways. Brainstorm about the many ways to convert existing clothing to make it fit better or just make it your own. Learn how to add small pieces of new fabrics (like fat quarters or just a 1/4 yard) to revitalize what you have already. Implement your design with needle and thread or bring your own sewing machine (as long as you know how to thread, wind and replace bobbin! remember your foot pedal.).
Prepare to be inspired. You will go home after this class and look at your closet in a whole new way.
Needles, thread, pins and other small notions provided for your use.
Supplies needed:
Clothing to recycle
Any new fabrics you might want to add
Sewing scissors
All levels welcome. If you are a beginner, please join us for the class on Sunday to put your ideas into action with your machine.
Cost: $20 adults, $30 adult with one child 8+
Note: If you have sewing experience and are comfortable threading, winding and replacing bobbin and troubleshooting tension issues, you are welcome to bring your machine along. Remember your foot pedal and an extension cord, please.

Sewing 101:BYOM (Bring your own machine!)
Sunday, May 19, 1:00-4:00pm
Adults and adults with children 10+
Brush off the dust on your sewing machine and learn to use it! This class includes threading, bobbin winding and insertion and troubleshooting tension. We will practice these techniques as well as straight and curved stitching while mastering the use of the foot pedal. You will then make a small drawstring bag that you can show off to all your crafty friends!
Supplies needed:
Sewing machine
Sewing machine manual if possible
Old clothing or fabric to practice stitching
1/4 - 1/2" yard of woven cotton fabric or a large buttondown type shirt
Sewing machines needles
Extra bobbins
Thread
Sewing scissors
All levels welcome.
Cost: $35 adults
*Already know how to use your machine but want to come sew anyway, and maybe help your neighbor?
Please join us, and bring your revamped clothing projects.
Join us here at Blackbird Arts to sign up for classes.
Saturday, March 9, 2013
Going on now in the shop...
Early this week, our friends lost their home in a devastating fire. To help them in their rebuilding effort, 20% of all sales in March and April will be donated to their fundraising effort.
New items will be added all week, including custom made dolls!
www.victoriavelting.etsy.com
New items will be added all week, including custom made dolls!
www.victoriavelting.etsy.com
Saturday, February 9, 2013
happy valentine's day!

Thinking about love a lot lately... And looking for some good ideas for handmade valentines for kids to make. Pictured above is a collage from our refrigerator last Valentine's Day.
Here are a few ideas that I have collected so far that I want to share to inspire you!
Tuesday, February 5, 2013
Featured today on Miriam Pico's Picnic at the Opera

Today, Tuesday at noon I will be telling my story to all of Traverse City at Miriam Pico's Picnic at the Opera. It's a lunchtime variety show, taped live so you can check it out at upnorthmedia.org. For those in TC, bring a sack lunch and enjoy the Old Town Players. They will pass a basket for donations to benefit the Old Town Playhouse and have a short interview with yours truly, complete with props and models. Cpme early to the Opera House in Traverse City to get a seat, they have been turning people away because it's so popular!
I'm so honored to be held in such esteemed company with other local artists, including Blake Elliot, Elizabeth Minor, Miriam Pico, Charles Murphy, Glenn Wolff, Kim Bazemore and Mimi Wheeler! Special thanks to Bronwyn Jones for connecting me to you this amazing group, Amylynn for her amazing friendship and Greg Holmes for the title of Visonary!
This will also be a great bonus as I continue to develop my sewing initiative, supporting local community with sewing instruction, workshops, machines and community sewing studios. Get the latest information on the recycled+revamped facebook page and like for a chance to win a free fairy doll.
You can find my work at 27 Stitches, Kinlochen at Crystal Mountain and www.victoriavelting.etsy.com where you will receive a free gift with all orders placed this month!
Please contact me if you would like to make a donation to the sewing initiative.
As Ben Harper sings, "I can change the world, with my own two hands."
Support local artists creating change and community!
Wednesday, December 12, 2012
Holiday Trunk Show

Please join me this weekend at Wool and Honey in Cedar, Michigan for all your last minute gift shopping. Choose from recycled headbands, zippy wallets, buckle clutches, modern tote bags, fairy dolls, checkbook/calendar covers, recycled leather wallets, tiny purses and more!
Friday, December 15, 6-9pm
Saturday, December 16, 10-2pm
Saturday, November 10, 2012
Getting ready for a show in Grand Rapids...

A unique and delightful experience for holiday shoppers seeking one-of-a-kind works by our region’s most exciting artists. This year’s sale expands to UICA’s newly opened 4th and 5th floors! Enjoy a fun and festive shopping experience with a cash bar on Friday evening, and a drop in Ornament Workshop on Saturday from 12–5 PM. Children must be accompanied by an adult. Visit uica.org/ham
Friday, November 30
3–5 PM | UICA Member’s Only Early Bird Event
5–9 PM | Free Admission, Open to the Public, Cash Bar
Saturday, December 1
10–7 PM | Free Admission Open to the Public
12–5 PM | Family Saturday Ornament Workshop
$2 Members | $5 Non-members
Working on some tote bags

It's show season. The inspriration comes so fast and frequently that I find sewing is all I want to do! So many people have shown love for my new goods that I'm encouraged to share the lastest batch of tote bags in my etsy shop.
Friday, November 9, 2012
masking tape and tissue paper lanterns

As the weather cools, our favorite festivals draw close. Today we made these lanterns out of recycled jars, torn tissue paper and making tape. Seems most all crafts have masking tape these days.
Hoping you enjoy Martinmas and lighting your own lanterns!
Monday, October 8, 2012
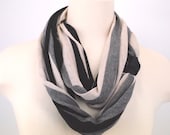
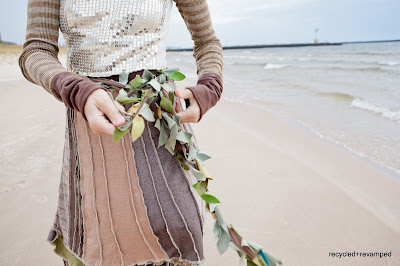
Recycled scarf series - elements

For about a year now, I have been thinking about the ideal scarf. Lightweight, colorful and unique, it must be made from recycled materials. It's fun to design when you have more parameters, don't you think? It forces you to think in ways you might not think otherwise.

Here are all the elements - water, earth, air and fire. Check out my etsy shop for all the details and to get one of your own.
Special thanks to my friend, Zane, for the lovely photo above!
Thursday, October 4, 2012
Makers Market 2012 in Traverse City

What a fun event! The weather was crazy - raining one minute, sunny the next. This continued all day long but most everyone just wore a raincoat and kept on shopping. The dress in front was inspired by a tree and of roots growing down. I found some great ideas for gifts and some cool rings made from paper! If you missed it this year, be sure to put Makers Market on your calendar for 2013.
Wednesday, September 19, 2012
New headbands for the Makers Market
Here's a whole new batch of headbands for my show on Saturday in Traverse City. Come check it out on the piazza at Building 50. There will be one-of-a-kind purses and clothing featuring recycled material.

Friday, September 14, 2012
first sewing lesson

He has been watching me sew for years now, and I was so excited when he asked me to show him how to use a needle and thread. We took a sharpie and made dots on the edge of the fabric, threaded the needle and knotted the thread.


Sunday, August 19, 2012
Revamped jeans at the Frankfort Farmer's Market
A few weeks ago, one of my yoga teachers asked me to repair these jeans. Here is the end result featuring a wood grain batik from my sweet bee sister:

Sunday, July 29, 2012


Subscribe to:
Posts (Atom)